Sunday, 8 September 2013

Rotary Sailing Camp 'Wind in the Willows' Cake

I recently mentioned the fact that in 2011 I went to Sweden on a sailing camp, but what I didn't say is that the whole thing (along with countless other camps and exchanges) was organised by Rotary. For those of you who haven't heard of it, basically Rotary is a club of volunteers aged 35 and over who have various initiatives and projects to help the community and charities etc. I know that's not too clear, but honestly it's very widespread and they do a lot of good work.
Part of this is focused towards youth and helping young people to gain new experiences, through international camps, short and long term exchanges, and work experience programmes. One of the best things about these is the fact that Rotary shoulders the vast majority of the costs; I stayed with a Swedish family for 10 days, learnt how to sail and spent about 60% of my time on the water, but also got to visit local attractions and have parties, all for the costs of a return flight and travel insurance!
I'm sure you're wondering what this has to do with food/baking but I promise i'm getting there! Since I went on a camp in 2011 and did work experience in Milan in 2012, I've had a lot of dealings with the Rotary club over the past few years and am extremely grateful for everything they have done for me. This year, for the first time in about 20 years, the Rotary district I live in organised their own water-sports camp and invited 12 international 'youths' to stay for 2 weeks. In order to make this possible quite a few Rotex-ers (people who have been on a Rotary International camp/exchange) volunteered to help out.
My part was to host one of the campers for a weekend, and also to go to the airport very early on a Monday morning to greet the arrivals. That first evening there was a welcome event with tea, coffee and cake- my mother kindly volunteered me to bake and decorate a cake for the event!
The theme of the camp was centred around 'The Wind in the Willows', the book's cover from which my design came from. As with all my fondant- iced cakes (I know you've only seen one so far but hold on!), I spent a full day baking, buttercream-ing, fondant-ing and then decorating the cake.
However this was new for me because beyond the gold lettering on my friend's 'Once Upon a Time' cake, I had never painted onto icing. I'm all about trying new things, so I thought actually it would probably be easier to paint a picture than to mould little animals and reeds out of fondant.....
I did study art A-Level but believe me that didn't help with this- I am no painter, more of a cutter and sticker! Even so, I know the basic techniques and I was really pleased with how this turned out.
You can buy actual paint for icing but these are mostly metallic and about £4 a pot, so I got some 'rejuvenator fluid' from Amazon (super cheap, I used less than half a bottle for all of this) which you can use to dilute gel food colours. This also meant that I got a wider range of shades and tones, although I did use a small amount of silver paint to make the water look more reflective.

I don't know if you noticed there is a thick, uneven dark blue line across the bottom right corner of this cake. This was an accident; literally as I sat down with a plain white cake in front of my, I took the lid off my blue gel colouring and went to put it down to the right, but it dribbled! There was no way I could get it off, and though I did consider carefully shaving off the top layers of fondant with a knife this would have made it uneven. In the end I just left it and carried on- this cake was made as a favour, and if you don't notice it at first it isn't too bad!

Sunday, 1 September 2013

Easter Bunny Cupcakes

As you can probably tell from the title, this is another post which was intended for many months ago! Although we may be closer the Halloween than Easter now, these cupcakes are still pretty cute; the method of decoration can be adapted slightly for many different themes. For example recently instead of bunny bottoms I made some which had the same shape, but looked like moles digging their way out of a hole.
The actual cupcake can be anything you want- mine were just basic vanilla- but it's the decoration which makes these exciting. I chose green buttercream for the base to look like grass, and piped it in smaller swirls instead of one large one to hopefully add to the 'grassiness'. Then I used white fondant to shape one large ball, one smaller one and two smaller rectangles. I flattened one side of the big ball so that it would sit on the buttercream easier, then stuck the smaller piece on top using a small amount of icing and water. The feet are definitely the trickiest bit; I used a little bit of food colouring to make some pink icing, then picked off tiny pieces and rolled them into balls before pressing them down into the rectangular white feet- one larger and three small ones per foot. This can be a faff but I promise it makes the cupcakes much more realistic and effective.
This design is simple and cute, but be aware that it does use more fondant than you might expect! Also they are more for decoration than eating really, unless you enjoy eating a big chunk of fondant- I don't, but I definitely know people who would!
I have since made these cupcakes again as part of an assortment for a friend's Alice in Wonderland themed murder mystery party (yes you read that right)- they went down well!

Once Upon A Time Storybook Birthday Cake

In my last post I mentioned that I have been making a few birthday cakes recently, iced with fondant which was a new exploration for me as i'm used to working with buttercream. I said this thinking that I had already posted about the first one I made back in March for my best friend, who is a big fan of the show Once Upon A Time. Unfortunately I have a history of procrastination and apparently I got as far as uploading the photos but then completely forgot to write anything or actually publish anything- oops!
So rewind six months and my friend's mum, who has been saying every since I took them their first batch of cupcakes that I should set up a baking business, asked me to design and make a birthday cake for her daughter i.e. my best friend. No pressure! I went round for dinner and then the three of us sat down to discuss themes, designs and flavours whilst I took notes. You should know that my friend watches a lot of films and TV shows, and when I saw 'watches' I mean she can get obsessed to the point where she will know everything about them. Her favourite at the time was Once Upon A Time which features a storybook as one of the central items, so we decided that I would make a book with maybe a few little symbolic items on top which related to the characters e.g. a hook, an apple. 
Between me being a perfectionist anyway and her being a huge fan, I thought 'this has got to be perfect because if there is any discrepancy between my cake and the original, she will know it'. Add to this the fact that i'd never worked with fondant before and you can bet I was stressing about it! I also really didn't want to let down my best friend, and this was for her party which her whole family would be attending, who I also know quite well.
Above is a 'real' replica of the prop.
The final cake was huge- at least 3 inches tall! I used white and brown fondant for the base of the book, then gold paint for the letters and 3D decoration. I also used a black paint pen to add in the line work around the edges and spine. The ring was made from white and green fondant then covered in edible glitter. Sorry about the bad quality photos, I took them late in the evening when I finished so the lighting wasn't very good.
I used a scalpel to make it look like the white fondant was actually pages rather than a solid blank block of icing.
This keyring is another replica from the show- it looks very complex but I decided it was easier than trying to make an apple without the icing cracking, or me having to buy lots of different paint colours. Obviously it would have been impossible to copy it directly into fondant, so I first drew the design onto paper then stuck it onto cardboard and cut it out to create a template. 
The final keyring was made from black fondant and covered in iridescent powder, which looked less purple in real life. Despite using a template it was still extremely delicate; I had to let it dry out slightly before putting it on the cake or else it was too floppy (the original is metal), but if I left it for too long it would break very easily.
The cake took a full day to bake and decorate, and when i showed it to my friend and her mum they almost cried! As this was my first birthday cake they had no idea about how good/bad I was, so they had been expecting something much simpler. It's so rewarding to see all the effort I put in paid off!

Swedish Cinnamon Buns


Here in England series 4 of the Great British Bake Off has just kicked off, and with it I find myself longing to bake purely for pleasure again for what must be the first time in months. Don't get me wrong, I have still been baking- mostly simple simple soda bread or fondant iced birthday cakes- but more through necessity than personal desire.
As I may or may not have mentioned previously in 2011 I went on a sailing camp in Karlshamn, southern Sweden near all the archipelago. If you have ever been to the country (or anywhere in Scandinavia I should think) you will understand why I fell in love with the place, the people and the way of life. Occasionally now I will look through my photos from that trip and it makes me very emotional; I have only seen one of my fellow campers since then, but I still love them all dearly and one day hope to return and visit the family I stayed with for the ten days I was over there.
Closer to home I have recently discovered the lovely Nordic Bakery in London, where they sell open sandwiches on rye bread as well as lingonberry tarts and their famous cinnamon buns. There are now only four weeks until I begin my new course at university and fly to Florence, but yesterday I found myself longing for something doughy and flavoursome. This  recipe is not from the Nordic Bakery Cookbook, as I sadly don't own it, but is one I have made only once before at my bread making day course at the Cambridge Cookery School.
 Swedish Cinnamon Buns
The yield will depend on how thin you roll the dough/cut the strips and also your method of 'assembling'- I made 17 and used the traditional method

Ingredients
For the dough
14g dried or 25g fresh yeast
50g butter
230ml milk
1 egg, lightly beaten (use 2/3 in the dough and save the rest for glazing)
50g caster sugar
A pinch of salt
1/2 teaspoon ground cardamom
400g plain flour
For the filling
100g unsalted butter, soft
3 tablespoons caster sugar 
2 teaspoons ground cinnamon 


  • In a small pan gently melt the butter, then add the milk and bring to finger temperature
  • If using dried yeast: mix the yeast with a little warm water and stir until dissolved, then cover with clingfilm and leave for a few minutes to 'sponge'. After this add a small amount of the liquid to the yeast mixture, then add to the rest and add the egg, sugar, salt, cardamom and flour
  • If using fresh yeast: dissolve the yeast in a little of the milk/butter mixture, then add to the rest of the liquid followed by the egg, sugar, salt, cardamom and flour
  • Work the dough with a wooden spoon- it should be very loose and sticky
  • Turn the dough out onto a floured work surface and knead until smooth and elastic, adding just enough flour so that it isn't too sticky without making it dry. This stage took me a good 10-15 minutes, I judged when it was ready by checking the gluten window*
  • Place the dough into a clean, lightly oiled bowl, cover and leave to rise for 45 minutes
  • Meanwhile mix together the ingredients for the filling
  • Tip the dough out onto a floured work surface and roll out into a rectangle roughly 1cm thick. Spread the filling evenly across the dough- remember to go right to the edges or else some of your buns will be plain!
There are now two ways to assemble the buns:

  • The traditional method is to fold the dough over in half lengthways so you end up with a long rectangle. Give it a light roll to compress the dough, then cut into strips about 2.5cm wide. Twist each strip- gently!- until it twists back on itself to form a knot shape, then place straight into a muffin tin or into paper cases
  • If this sounds a bit too complex, instead of folding the dough you can roll it up from the long side and slice it into sections again about 2.5cm wide. You can then place these bits cut side up into the muffin tin or cases; with this method they look a bit more like individual chelsea buns
To finish them off:

  • Brush the buns with the remaining egg and sprinkle with confectioner's or caster sugar, then loosely cover with clingfilm and leave to prove for 20 minutes
  • Meanwhile preheat the oven to 220C/200C fan assisted
  • Place the buns in the top third of the oven and bake for 7-9 minutes or until golden
These are best eaten warm straight from the over as the filling is sticky and gooey, but you could also make some thin glace/cream cheese icing to drizzle across the top like a cinnamon swirl. 
After making these at home now I would actually consider rolling the dough thinner next time and making more of the sugar and cinnamon filling, as that's where the real flavour comes from. I also think that using confectioner's sugar instead of caster (which I had to use here) makes the buns look a bit prettier, and is more authentic too.

Wednesday, 30 January 2013

Wholegrain Spelt Bread

I may not be the most experienced bread baker but I love to experiment, often especially with recipes which are a bit beyond my ability! I also really like looking at good quality, interesting ingredients, so when I was browsing Holland and Barrett the other day and saw some Dove's farm organic wholegrain spelt flour I decided to buy some and try it out. There were a couple of recipes on the side of the bag but I decided to stick with good old Paul Hollywood, so used a recipe from his book 'How to Bake'. Rather than go crazy and try rolls or something, I just made a very basic loaf using a loaf tin. 
It was going great until I accidentally over-proved it, but I just re-shaped it and let it rise again and I think it worked fine. I was particularly pleased with the slashes and flour on top, even though they don't aren't exactly technical/taste aspects; I thought they looked more professional! 
Spelt flour was used by the Romans and although it is made from wheat, it has lower gluten levels than ordinary bread flour. This does mean that it has to be kneaded for longer in order to build up the gluten so it will rise properly. It has a slightly nutty taste which I personal love, and feels really rustic. It isn't a cheap flour (probably not helped because the bag I bought was organic!) but so yummy and good for you too.

Wednesday, 16 January 2013

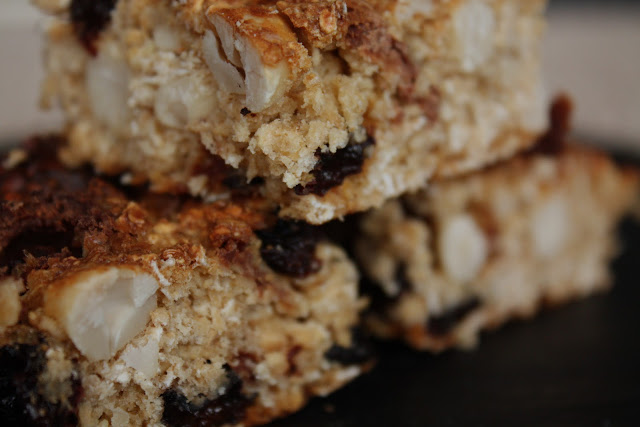
Homemade Cereal Bars

What do you eat when you don't have time for a proper breakfast? Or if you're on the move and need something to keep you going? The answer for most people would be a cereal bar. There's a couple of issues I have with shop- bought ones, the main one being that they are so expensive. Especially if you want ones with fruit and nuts in them, or with any kind of goodness. My other gripe is that they generally feel healthy, but they really aren't, which is a major disappointment. Even the ones loaded with healthy things like dried fruit, nuts and seeds are also packed with sugar (naturally occurring or otherwise).
I know there are some healthy cereal bar recipes out there but I am yet to try them; the recipe my family uses however I think is cheaper than buying several boxes of the things. So I guess solving one problem is better than none? They are also tasty and really adaptable to whatever you have lying around in the cupboard (or in my case, the pantry).


Cereal Bars (makes one tray's worth, I usually use a square silicone dish)

Ingredients
250g rolled oats (just the cheapest are fine)
40g butter, melted
405g can of condensed milk (this is the unhealthy bit...I use the Nestle light version)
350g of whatever you like; nuts, seeds, dried fruit, chocolate chips etc. For the bars above I used a mixed bag of sultanas, peanuts and chocolate buttons my mum was given for Christmas.

Method

  • Preheat the oven to 175C (for a fan assisted oven)
  • Mix all of the ingredients together in a bowl- don't worry if it looks dry, just keep mixing
  • Press the mixture into the base of a tray or dish, press down gently with the back of a spoon
  • Bake for 30 minutes, or until it looks golden brown and set. This is personal choice really, depending on how hard you want them to be. I've almost burnt them before but they still taste fine!
  • Let it cool in the tin, then turn it out and cut into squares or bars. Store in a cake tin or airtight container; I don't know how long these last but I've kept them for over a week before and they were absolutely fine. To be honest these are really more-ish so they never last that long!

Ciabatta

As I think I mentioned before, I got my mixer mainly so that I could make bread's from a sloppy dough which would be too hard to handle by hand (based on what Paul Hollywood said in his book). One of these recipes was ciabatta, so I thought i'd have a go as they seem like a pretty simple bread. The dough was super easy to make, and although using a mixer does feel a bit like cheating it feels pretty cool to be able to walk around whilst it 'does it's thing' without help. 
The dough is left to prove in a square/rectangular container which is supposed to make it easier to shape into individual rolls; the idea being that you simply tip the risen dough out onto a floured surface and cut it in a cross shape into four pieces. That's not exactly how it happened for me as the dough was so soft when I turned it out, almost runny, so I had to gently shape them back into rough rectangles. Even so, I think they look pretty uniform, and they tasted great too!

I think my favourite thing about this bread (maybe it's just my loaves in particular) it the swirly floury pattern across it; they look so pretty!